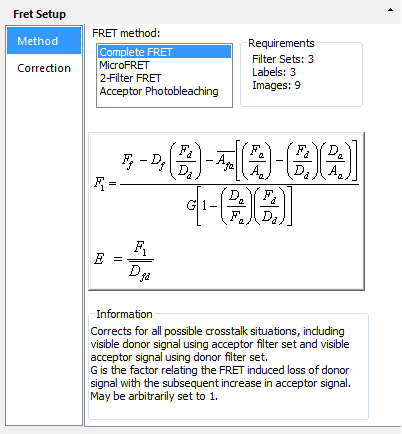
To start your FRET analysis, you first need to choose the FRET correction method. This step determines the algorithm to apply, the filter sets to use and the image combinations required for the calculations.

To choose a FRET method, click on one of the methods in the list. The available methods are described below.
This method corrects for all possible crosstalk situations, including visible donor signal using acceptor filter set and visible acceptor signal using donor filter set. G is the factor relating the FRET induced loss of donor signal with the subsequent increase in acceptor signal. G may be arbitrarily set to 1.
Complete FRET requires 3 filter sets and 3 labeled specimens for a total of 9 images.

This method assumes simplified crosstalk. No signal visible with acceptor labeled fluorophore and donor filter set. (Da = 0) No signal visible with donor labeled fluorophore and acceptor filter set. (Ad = 0) MicroFRET requires 3 filter sets and 3 labeled specimens for a total of 7 images.

This method assumes the concentration of donor and acceptor are correlated: Acceptor concentration is whole number multiple of the Donor concentration. Our calculations assume a 1:1 ratio. 2-Filter FRET requires 2 filter sets and 3 labeled specimens for a total of 6 images.

This method measures the donor emission before and after acceptor photobleaching. It provides an alternative method of quantifying the FRET efficiency and can be used to provide a double check on previous FRET methods. Acceptor Photobleaching requires 1 filter set and 1 labeled specimen at two time points for a total of 2 images.

Once you have chosen the FRET method, click Correction to go to the next step.